
Jan 25, 2023 | WordPress How-Tos
Artificial Intelligence (AI) is all of the current buzz. It’s hard to open up social media without hearing about it. As a WordPress site owner, there are great ways for you to use AI for your website content generation. The specific AI bot we will talk about is ChatGPT.
What is ChatGPT?
ChatGPT is a large language model developed by OpenAI. It is a variant of the GPT (Generative Pre-training Transformer) model and is trained to generate natural language text. It is trained on a vast amount of text data, allowing it to understand and respond to a wide range of topics and questions.
It can be used for a variety of natural language processing tasks, such as language translation, text summarization, and question answering.
It can also be fine-tuned for specific use cases, such as generating product descriptions or writing essays. ChatGPT is one of the most recent versions of GPT models, which is specifically designed to generate human-like text in conversational contexts and is available for developers to use via OpenAI’s API, which allows for easy integration with various applications, such as chatbots and virtual assistants.
How can ChatGPT be used for Marketing?
There are several ways that ChatGPT can be used for marketing, here are some examples:
- Content creation: ChatGPT can be used to generate high-quality, unique content for marketing campaigns, such as product descriptions, blog posts, and social media posts.
- Chatbots and virtual assistants: ChatGPT can be used to create conversational agents, such as chatbots and virtual assistants, that can interact with customers and provide personalized support and information.
- Email marketing: ChatGPT can be used to generate personalized email campaigns that can improve open and click-through rates.
- Ad targeting: ChatGPT can be used to analyze customer data and behavior to identify the most valuable target audiences for marketing campaigns and optimize ad targeting.
- Influencer marketing: ChatGPT can be used to identify and target influencers for marketing campaigns, and also track the success of influencer marketing efforts.
- Social media monitoring: ChatGPT can help businesses monitor and track customer interactions on social media platforms and generate insights for future marketing strategies.
It is important to note that using ChatGPT for marketing requires fine-tuning the model with specific data and tasks. Also, it’s a good idea to test and evaluate the performance of the model before deploying it for a real-world application.
Overall, ChatGPT can be a powerful tool for marketing, allowing businesses to generate high-quality content, personalize interactions with customers, and make data-driven decisions that can improve marketing ROI.
How To Get Started
In my opinion, the best way to get started with ChatGPT is to open a free account at https://chat.openai.com/ and have a conversation with the bot. Ask it a few questions about how it would do your service or use your product. It works just like text messaging with your best friend.
This will give you an idea of how to best utilize the output from the ChatGPT bot.
Remember one thing, if the output from the bot isn’t perfect you have the choice whether to use it as a starting point or not use it at all.
While there is a lot of enthusiasm surrounding AI, it is still a very young technology with notable shortcomings. Nothing out there replaces human intelligence.

Apr 24, 2020 | WordPress How-Tos
Is it possible to restore a WordPress website from the Wayback Machine Internet Archive?
The short answer is the Wayback Machine can assist you but it can’t recover the whole site in the same way that a WordPress site backup can.
What Is The Wayback Machine?
The Wayback Machine is a web spider and search engine similar to Google. Instead of returning answers to questions, it returns a history of website changes. You enter a website URL and the wayback machine will show you the different versions of the site it has recorded. If you are curious what a site looked like 5 years ago, the wayback machine might know!
And I use the word “might” intentionally. The internet is a big place. The Wayback Machine stores a lot of internet history but it certainly has limitations. One of which is popular sites are more likely to be present than lesser known sites.
If you want to ensure your website is a part of history, use the “Save Page Now” form on the Wayback homepage to have your site recorded.
I Found My Site, Can I Restore It?
When you find your content, what you have is the front end representation of your content. Think of it like receiving your content in a MS Word doc. Your content exists but none of your plugins or theme settings are there.
Restoring from wayback content depends on what condition your current website is in.
If your purpose of restoring this content is to save you from rewriting it for your existing website, you’re in luck. Copy and paste the wayback content into your site just like you would if you found your original written words in a Word doc.
If you don’t have a website or are starting over with WordPress for the first time, the process is a bit longer. You have to make the WordPress site first. Configure the basics of your site theme such as your colors and logo, and then paste in your content.
If you had a SEO plugin like Yoast or Rank Math, you will have to add in the focus keywords and other settings manually. Unfortunately there is no way to get plugin data like this from the frontend copy of the website that Wayback keeps.
In Summary
Wayback Machine content has its value. It can rescue you from rewriting content you wrote in the past. But it is not comparable to a WordPress backup because it doesn’t save your theme and plugin settings.
Keeping a good backup copy of your website is extremely important. This is why all of our OnSiteWP WordPress maintenance plans include an offsite backup. Even if your server crashes, the OnSiteWP offsite backup of your site is on a different server. Redundancy is key when disaster strikes.

Apr 17, 2020 | WordPress How-Tos
OnSiteWP recommends businesses use a Google G Suite account to host their email services.
There are many reasons for this.
First, the G-Suite account doesn’t share resources with your web hosting account. If your website becomes busy, it doesn’t slow down your email. And if you keep a lot of email in your folders, it doesn’t take space away from your website. Finally, the spam protection and deliverability of email from Google is the best in the business.
Other G-Suite applications like Calendar and Drive (to store files online) are also very useful for businesses.
The question that often gets raised is how do I use my personal gmail and business G Suite account at the same time.
This is actually easy.
Sign in To Multiple Google Accounts
First login to your gmail account with any of your accounts. I like using my OnSiteWP business account as my first login because Google will use this first login as the default account across all other Google services such as search console and Google Analytics.
Next, click the Account icon in the very top right of Gmail. For some people it will have your profile photo. For others it might be your initials.
Here is what the Google Account menu looks like:
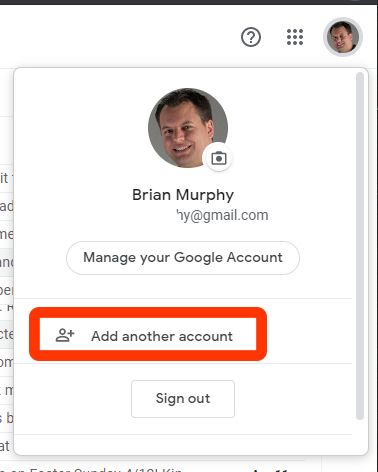
I have circled the “Add another account” link in red. Yours will not be circled.
Click this Add another account link.
Google will ask you to login to your other account and return you to Gmail.
This “Add another account” trick works for all of the various Google apps.
Switching Between Accounts
After you have logged into a second account, it is easy to switch between your different accounts.
Click on the Account menu in the top right again.
This time, you will see a list of your various logged in accounts.
Here is how the account screen looks with multiple accounts:
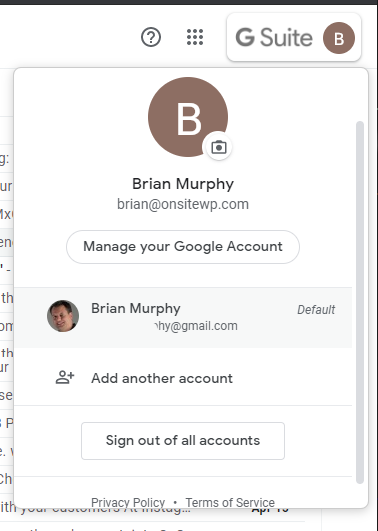
I will explain this screen.
The top part of the screen shows the Active account. In this case, it is my Brian at OnSiteWP G Suite account.
Under the Manage your Google Account link is a list of the other accounts I have available to use. If I click the other Brian Murphy account, Google will switch into that account.
If I had a third or fourth account, I could use the Add another account link to add more accounts.
Quick Tip
Here is a quick tip.
When the Account menu is closed, it shows the profile photo from your account settings. Use a different profile image for your various Google Accounts. Then you will be able to see at a glance which account you are currently using.
Your profile photo is set by clicking “Manage your Google Account” on the Account menu and clicking “Personal info” on the left sidebar. Be aware that if your correspondents use Gmail or Google Calendar, they will see your profile image from their screens so use a flattering image!
Contact OnSiteWP if you are considering Google’s G Suite for business. We have a G Suite setup service that takes the pain out of your initial setup.

Feb 27, 2019 | WordPress How-Tos
It is great that the Stripe plugin for WooCommerce provides Apple Pay support.
What is not so great is that by default, the customer sees “Pay COMPANY_NAME (via WooCommerce)” on the checkout form.
For the most part, customers don’t care which software platform your store is based on. And in the worst case, not knowing what “via WooCommerce” means might scare your customers into abandoning their shopping cart. You definitely don’t want to lose an order because the customer was scared or confused.
So our recommendation is to remove the ‘(via WooCommerce)‘ advertising from your e-commerce checkouts.
Removing Stripe’s via WooCommerce for Apple Pay Payments
OnSiteWP recently researched this question. Unfortunately the Stripe payments plugin doesn’t have a checkbox to remove the woocommerce branding. Our solution was found by reading through the WooCommerce Stripe plugin PHP source code.
Our resident WordPress developer found an easy way to fix it so we are sharing it with the WordPress community. (Thanks Brian!)
It involves adding a line to the functions.php file in your WordPress site’s child theme. If you don’t have a child theme, we recommend you set one up. Otherwise an update to your theme will overwrite this modification.
Add this one line to your functions.php:
add_filter( 'wc_stripe_payment_request_total_label_suffix', '__return_null' );
That’s all it takes!
If you have other nagging woocommerce problems, we encourage you to contact OnSiteWP for a free quote. If it turns out to be an “easy” fix like this one, we can have it solved very affordably within the same day!

Jan 25, 2018 | WordPress How-Tos
Let’s admit it, I spend too much time on Facebook. In my defense, it’s not all spent looking at memes. I have plenty of WordPress support groups that I follow.
One of the problems with Facebook is that it’s not spidered well by Google. And most groups require that you login and be a member to see the posts. Facebook’s own search system is practically useless. The end result is much of the knowledge is lost.
There was a question in the Advanced Woocommerce group about what the Webhook “Secret” field configured in the Woocommerce Webhooks dashboard area really means.
The woocommerce docs can be really poor. In this case it lacks important details such as what kind of hash is used and how to use this secret in your application receiving the hook. With no guidance on the value to put in this field, what is a user supposed to do?
(If anyone from Automattic or woocommerce is reading this, a link from the end user docs to tech docs would be super helpful for obscurely defined configuration fields like this one.)
In addition to the Woo dot-com docs and developer codex, there are little-known WC developer docs on github. These are designed for the Woocommerce REST API.
My first nugget of wisdom for WordPress developers: When the woocommerce.com PHP docs suck, sometimes more details can be found in the REST docs, as was the case here.
In my attempt to help the next person with the same question, here is my answer on how the woocommerce webhooks secret field is used. (links to this page are encouraged)
The Meaning Of The Woocommerce Webhooks Secret Field
The secret has a little better description on the github REST API docs than the woocmmerce.com end user docs. It is documented as the “Secret key used to generate a hash of the delivered webhook and provided in the request headers.”
Later on in the github docs is a description of how the hash is received – as a HTTP header in the webhook response. “X-WC-Webhook-Signature – A base64 encoded HMAC-SHA256 hash of the payload”.
You have to know a little bit about cryptography to understand this.
A hashed MAC is used to verify the data integrity and the authentication of a message. The SHA256 HMAC algorithm is satisfied by a 32 byte key. We’re talking a full entropy key (complete random characters in the key). The maximum key size is 64 bytes. Anything larger is reduced to 32 bytes.
You can use this php code to generate a base64 encoded hash MAC on your receiving side to compare with the X-WC-Webhook-Signature value in the HTTP header in order to validate the message. If your encoded hash signature and the one in the HTTP header match then you are able to assume this is a valid response from the woocommerce site.
$yourHashSig = base64_encode(hash_hmac('sha256', $request_body, $secret, true));
The secret used here is the same secret value set on the woocommerce webhooks configuration page.
The hooks are not replayed. If you miss it, it’s gone. Webhooks, unlike an API, are 1 way and don’t require a response.
OnSiteWP WordPress Support Plug
OnSiteWP is different from other WordPress support companies in that we have experienced WordPress developers on staff to answer questions when Google search fails you. As part of our 1-time WordPress Fix It service, we will be happy to explain an poorly documented plugin field to you.
If you have developed a lot of sites and don’t want to be responsible for plugin updates or if the site gets hacked, our WordPress maintenance affiliate program may be of interest to you.

Dec 27, 2017 | WordPress How-Tos
I’ve written on many marketing and beginner topics. It is time to give my WordPress developers some love.
The linux command line is something that strikes fear into many WordPress developers. Even some really great ones. But there is no need to be scared. Learning the basic format of a command a few commonly used commands can get you jump started.
So many linux tutorials assume that you will be the server administrator. For a website developer that is not the case. The hosting company has the admin side handled. I am gearing this tutorial towards what is known as userland. The place where users happily get their work done.
Please remember that the linux command line is case sensitive. This means that upper case letters are considered distinct from lower case letters. All of the basic commands are going to be lower-case.
The Pattern of Commands
Most commands follow a common pattern:
- The command name
- The command options
- The files to apply this command to
Every command starts with the command name. It always comes first. The linux philosophy is each command has a single small purpose. Later on when we get advanced, I’ll show you how to chain commands together to do incredible things with a few basic building blocks. Examples of commands are listing files (ls), changing directories (cd), unzipping files (unzip)… basically everything you can dream of.
The command options are… get ready for this… optional. Sometimes a command does what you want by default. Other times you use an option to modify the behavior of a command. Take the ls command used to list files. With no options ls simply prints the names of the files in your current directory. I find it much more useful to see the “long” listing because it displays the file permissions, date, size and name together. “ls -l” is the option to get the long listing.
Often times the command will take an action on a file or directory. This file or directory is given last in the command. A common task is changing into a directory. (think double-clicking into a folder on windows or your mac) The change directory (cd) command needs to know the name of the directory to switch to. When I’m at the top of my wordpress folder and want to change into wp-content the command is “cd wp-content“.
Level 1
I’m going to split this into two levels. The first will show you how to move around the filesystem and read files. The second level will really make you look like a pro!
exit
The exit command is simple. For our purposes it serves as the logout command.
Connect to your web hosting account with ssh, type exit and press enter. You will be logged out. Repeat this as many times as it takes to feel comfortable.
ls
ls lists files. It is similar to the dir command for people who know the DOS/Windows command line.
The command line scares many people because they feel lost. They don’t know what folder they are in or what files are in that folder. Type ls and press enter. This will show your files.
ls is one of those commands with a ton of command line options. When you read the manual you will see that the developers ran out of lower case letters and started mixing in options with upper case letters too!
For our purposes there is one ls to rule them all: ls -la
This lists our files in long format and shows ALL files. Linux systems by default don’t show filenames beginning with a dot (.) in the name. Dot-files as they are known are typically used for system configuration files. In daily life, the config files can clutter things up so the designers of linux decided to omit them unless the -a option is given. As a web developer there is an important dot file to watch for: .htaccess. I’m sure you are already aware .htaccess is used to modify how apache treats files, can handle redirects and more.
There are two special directories you’ll see in every ls -la. This are “.” and “..”. The single dot is a reference to the current directory. Double-dot “..” references one directory up from your current directory.
pwd
pwd shows what your present working directory is. Knowing your current directory helps you understand where in the filesystem the files you are looking at exist. When you forget where you are, pwd will remind you.
cd
cd changes directories. As mentioned above, it is just like double clicking a folder in a GUI.
Tying it together: cpanel style servers will drop you in what’s known as your Home directory. This is the common starting point for your files. Type ‘ls -l‘ and you will see the public_html folder. Type “cd public_html” and you will get changed into the public_html folder. Type “ls -l” again and you’ll see your WordPress files. Repeat “cd wp-content” and “ls -l” to switch and view your wp-content folder files. Type “cd ..” to hop up a folder level. Type “pwd” to show which folder you are in.
If you are ever totally lost, type cd alone with no directory name. This will reset you back to your Home directory.
And like that, with 3 commands, you are a full filesystem explorer.
less
Moving up and down the filesystem is one thing. Do you want to read a file? Use the less command.
Change into your WordPress public_html folder and type “less index.php“. This opens the index.php file in the file reading program.
Pressing Enter moves you down one line at a time. Pressing space bar moves down a page at a time. Pressing b moves you back a page towards the top of the file. Pressing q will quit out of less, which returns you to the command line.
In WordPress index.php is pretty boring. Using “less wp-config.php” or “less .htaccess” is much more common when exploring a site on the command line.
cp
cp is used to copy a file. As a wordpress user I most frequently use cp make a backup copy of a file before uploading a change.
cp takes two parameters, the original filename and the new filename.
In order to copy wp-config.php to a new name such as wp-config-backup.php you would type: cp wp-config.php wp-config-backup.php
Now if you mess up your wp-config.php you can always copy the backup on top of the messed up version like this: cp wp-config-backup.php wp-config.php
cp like many linux commands doesn’t give you many “are you sure?” roadblocks like windows or a mac. Linux assumes you are doing this on purpose and cp overwrites the file before you can blink. You’ll be rushing for your website backups if you get careless with cp, mv, rm or any of the file operations.
There is one trick to know about cp. It is used to copy files. It can also copy directories if given the -r option.
cp wp-content wp-content-backup will complain wp-content is a directory. cp -r wp-content wp-content-backup will copy the entire wp-content directory tree to a new wp-content-backup folder.
mv
mv moves a file. Everything I said about cp applies to mv.
The difference between a copy and a move is that in a copy, the original file is not changed. A move renames the file. Think of it like copying the file and removing the original.
If you want to move your wp-config.php out of the way to an “old” version so that your FTP program doesn’t complain the file already exists when uploading you can rename it with mv wp-config.php wp-config-old.php Please be aware that your wordpress site won’t run until you upload a new wp-config.php or move the old version back into place with mv wp-config-old.php wp-config.php
rm
rm removes a file. It is swiftly deleted.
If you want to trash your .htaccess file so that saving permalinks writes a new one: rm .htaccess
rm has the same directory protection as cp and mv. If you want to remove an entire directory use the -r option. If you hate your entire website and want to remove it so that you can drop in a new duplicator installer.php and zip file, first cd into your public_html folder and run: rm -r *
The * means all files in the directory. (all files except dot-files)
unzip
unzip does the obvious, it unzips a zip file.
If you want to manually install a plugin, upload it to your wp-content/plugins folder. cd wp-content/plugins Run ls to make sure you see the file in there. Then type unzip yourpluginname.zip to get it unzipped. From your wordpress dashboard you will see it listed and available to be activated.
Level 2
Coming soon!