[Transcription]
Hi there, Mark Rudder with OnSiteWP.
I’m going to show you how to migrate a website from one hosting environment to
another, or from one hosting company to another.
These are WordPress websites and it’s pretty easy to do.
We’re going to use a few plugins to do it.
Say you’ve decided that you want to upgrade your hosting platform to
run your business, and you’re going to move from one hosting company to another.
Or maybe you’ve built a website for a client and now you need to move it live
to their hosting company or their hosting account.
Or you built it on your localhost and need to move it to a server.
Or say maybe you and your girlfriend we’re sharing hosting and she caught you using Internet Explorer and just told you to move out. Anyway let’s move on.
This site has some some fake content, but it is a real site.
I used a plug-in called FakerPress which creates pages, posts and images to see what new site might look like.

I also noticed it has quite a few spam comments. For a site that has nothing.
it seems to be pretty popular. I guess I ought to get rid of those.
So let’s look at the plugins that I have installed.
I like to start with All-in-One WP Migration. It’s not the only way, but I have found it be one of the easier ways.
I also have Duplicator and UpDraft Plus, which both can be used to migrate a site.
We use UpDraft Plus on all of our client sites for backups.
Off-site is the preferred way to store backups, and much safer than storing them on the same server as your WordPress installation.
We can also use UpDraft Plus to restore a website which is kind of cool as well.
The steps are:
- Create a copy of the entire site that will be uploaded to the new hosting server
- Create a brand new blank WordPress installation on our new hosting company.
- Use All-in-One WP Migration to upload and install the entire site at the new hosting location.
So let’s do it:
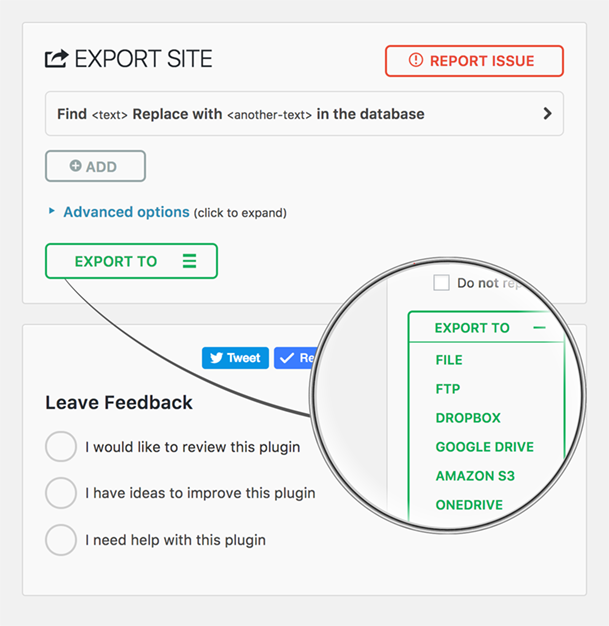
Install All-in-One WP Migration plugin if you don’t already have it.
Go to the All-in-One WP migration tool on our exiting site and we’re
going to create a complete copy of the site.
It’s going to create an install-able file to use for migrating.
Click the Export button.
It gives some options where to store the file, but we’re going to just create a downloadable copy.
Download it to our computer where you can find it later.
It won’t take long because this is not a very big site.
If you have a larger site over 500 MBs I can show you how to edit the code a little bit to increase that size, but you have to contact me on our contact form,
or connect with me on LinkedIn. Mark Rudder on LinkedIn.
and I’ll send you info on how to do it.
(if this is already too much info, we include free site migration with all of our hosting plans)
WordPress Hosting Services
When it’s done creating the “package”, the package that All-in-one WP migration uses, download that file.
It won’t work with any other plugins. It only works for All-in-one WP Migration
Now we need to go to our new hosting platform or our new hosting Environment.
Yours will be similar to this. This is cPanel with the paper lantern theme.
There are a few things we have to do to set up your new hosting account or platform
First of all we need to “Addon” the domain name if it wasn’t the one you used when you created the account.
Your domain might be coming from another hosting company or another environment (domain registrar).
It doesn’t matter where it is. The steps are the same.
First, we need to create a place for it on our new hosting account.
Let’s say we finally bought WPblockchain.com for our domain.
This is not available so don’t even check. I wish it was.
(in acknowledgment of the blockchain technology)
Just click Add domain.

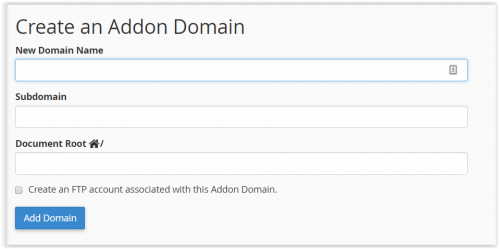
Once we create the addon domain it’s going to create a new directory in the root of
our hosting account or our hosting environment.
I’m sure you’re thinking “well how is this going to work if you don’t own WPblockchain.com?”
I’m glad you asked and I’m going to show you how to get around that.
It’s a way to set up in a working WordPress installation and test it before actually launching it or making it “live”.
Once the site is built and tested, then you point the domain name at your domain registrar dns settings.
That way you have no downtime when you’re migrating a site.
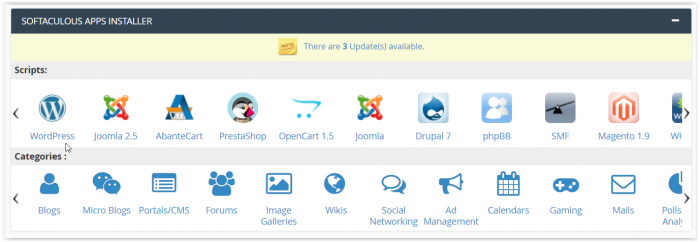
Now we need to spin us up a WordPress site.
You can do that in Softaculous or whatever option your hosting provider offers.
It only takes a minute.
We just click install to create a WordPress installation.
We can use HTTPS for now.
It will probably show the non-secure warning in Chrome but that will get fixed after the new site is up and running.
We need to pick a directory for the new install.
Remove any directory info, otherwise it will install the new site there:
/wp for example. We don’t want this.
If it does get installed in another directory, you won’t be able find your site with just the domain name. Trust me.
Enter a username and password, but keep in mind, this will get overwritten when we move the site over. I normally just use the same username and password for the existing site.
This blank site you’re creating will get wiped out and replaced with the site we are moving. Just use the same login info.
After everything is entered, click install and it’s done.
We will not be able to view our new site because the domain is not pointing to our hosting server… yet.
If you’re keeping the same domain name, it still points to the old server.
You don’t actually don’t want to point the domain name to the new hosting/server until you get the site up and running, and completely working.
You will essentially have two versions of the same site.
After it’s thoroughly tested, can then flip your domain name from your domain registrar over here to the your new hosting account.
I’m going to show you how to get around the domain thing prior to actually pointing it at the domain registrar.
On Windows it’s pretty easy. I’m going to show you how to do it here.
On a Mac, here are instructions: Hosts File on a Mac
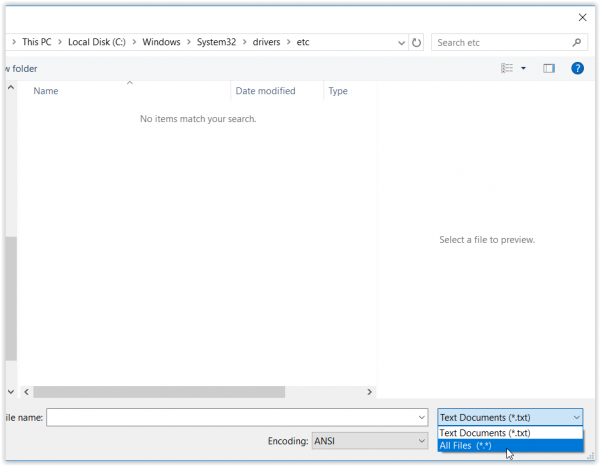
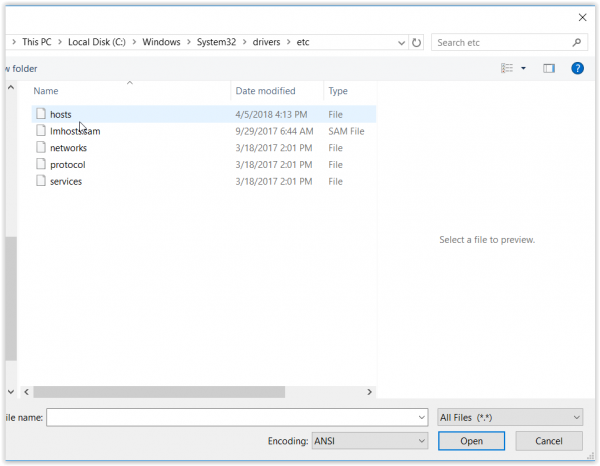
On Windows find notepad, and right click and “run as administrator”.
Then we’re going to look for a file called “hosts.
It’s in Windows/system32/drivers/etc
The directory will appear empty because it’s not a standard text file.
It’s a special file.
You will need to select “All Files” in the drop down at the bottom.
We’re changing the dns/domain name locally, on our system, to point to the IP address on our new hosting account.
It’s really simple.
Look in your server info on the new hosting account.
It’s the shared IP address. That’s the number we need.
This is the IP Address of your hosting account.
Copy that and stick into our hosts file and then enter our domain name without the www.
The do it again with www.
We’re telling our computer that if we go to that domain name to use this dns number or IP Address.
Like this:
72.14.192.0 wpblockchain.com
72.14.192.0 www.wpblockchain.com
Save that file. Keep notepad and the Hosts file open in case we made a mistake.
Let’s see if we can now get to our new hosting account and the blank WordPress installation we created. Click on your domainname.com/wp-admin.
You can also click on the link in the WordPress installer in Softaculous in cPanel.
If everything works, you should automatically be in the new site’s backend.
We’re getting an error now because we told it to do SSL/HTTPS but there’s no SSL installed yes.
We use LetsEncrypt on this hosting company, but it won’t install an SSL Certificate until the domain is actually transferred at the domain registrar.
There is not much to the site. It’s just a standard blank WordPress install
Now we will add our all-in-one WP migration plugin.
Just do a search in the plugins area for migration.
Install it.
Now let’s go import the file that you downloaded from the existing site.
It will display a warning that it’s going to overwrite your database, media, plugins and themes.
It will overwrite the entire website and all the files at this location. It’s an empty site so it’s fine.
This includes all usernames and passwords.
This is why we just use the same login info for both sites.
After it completes the upload just click close.
Because I didn’t change my admin email, it’ll be very difficult to reset it, so I
use LastPass username/password for our previous site.
We copy username/password from our the existing site and log back in.
The site is essentially installed
it’s overwritten everything, which means we have a cloned website.
All content, users, everything.
Click the Update Permalinks button and the dialog will close and you will be logged out.
Log back in and update the permalinks.
The most common permalink structure is %postname% and is generally accepted as the best for SEO.
Now let’s go look at the front of the site see what we have.
It should be a complete cloned version but on a different hosting server.
Check the site and make sure everything is working and all content is there.
We cheated the DNS system for the URL by using the hosts file.
This is how you move and migrate a site.
Now you need to go into your domain registrar and point the domain to your hosting
company by changing the name servers.
For example: OnSiteWP Hosting uses:
NS1.onsitewp.com
NS2.onsitewp.com
It may take some time for the DNS to update your domain to the new IP address.
Once it is resolving to the new host, delete the dns numbers in the hosts file.
That’s how it’s done.
Thanks for watching.
We offer free site migration when you join our hosting service.
Check out the plans here. WordPress Hosting Services
Author: Mark Rudder
I enjoy helping business owners and entrepreneurs achieve their goals and boost their profits with WordPress. Your website is your place to showcase your products and share your expertise with the world. WordPress makes it easy.